

It’s day 4,391 of quarantine, so let’s do something productive before we hit day 4,392. Let’s turn a flashlight on something you may be overlooking every day: your Instagram bio.
When people land on your profile, their mind immediately races through a range of questions. Who are you? What do you do? Why should I follow you? If you haven’t managed to provide answers within 0.05 of a second, you lost an opportunity to gain a follow. To make a great first impression, here are 6 tips on how to stand out from the crowd with your Instagram bio.
1. Your avatar
Choosing the right avatar is easier said than done. Even some of the big brands out there make mistakes, such as posting a low-resolution avatar that looks pixelated. Currently, the dimensions for a profile picture on Instagram are 110x100px for mobile, but as avatars look slightly bigger on desktop, it makes sense to upload a larger pic — Instagram will resize it automatically. Just make sure to crop it to 1:0 ratio, so that you don’t lose parts of your image.
But those are technicalities.
The tricky part is to choose an avatar that does a good job at representing who you are.
If you’re a brand, the best thing to do is, of course, choose your brand logo that is instantly recognizable. This is also the easiest solution as it helps you stay visually consistent across all your channels. However, if you’re, say, an influencer, or an entrepreneur, or a blog owner, the best practice is to put a picture of yourself that clearly narrates who you are and what you do.
To illustrate what I mean, check out this example from @alexstrohl, an Instagram photography influencer, whose avatar depicts him at his best — holding a camera, taking pictures. Just from looking at Alex’s avatar, it is instantly clear that his account will be all about photography:

Or here’s another example from @kori_nikkonen, a Berlin-based ballerina and fitness influencer. Her choice of avatar, where she’s depicted wearing a flowy dress, ballet shoes and a ballet bun, clearly represents the lifestyle fundamentals of her brand:

To summarize:
- Always make sure your avatar is high-quality, not pixelated, and will look good on any device
- If you’re a brand, opt for your own logo for an avatar
- If you’re not a brand, put a picture of yourself showing what you’re best at, preferably depicting your work in progress
- Choose something memorable, something that stands out
- Make sure your avatar resonates with the color palette of your whole feed.
Once you cracked the avatar code, proceed to the next point: choosing your name.
2. Your name
The second step to building a perfect Instagram bio for business lies in making sure that your name is, in fact, your name and NOT your Instagram username. Thing is, your name and username are the only two factors that Instagram takes into consideration when it’s answering people’s search queries. If people decide to look you up on Instagram, they will use either your real name or your company’s name, so it’s counterintuitive to have your name match your Instagram handle as you’re decreasing your own searchability.
But of course, another way you can be found on Instagram is through keywords. By putting one in your name, you’re tripling your searchability scores — even if your handle doesn’t contain the keyword, people would still be able to find you through the keyword in your name. Like here in the example below, where I just typed “vegan” in the Instagram search, and @aniahimsa came up, even though the word “vegan” is not part of her official Instagram handle:

It’s up to you (and your business’ specifics) what you want to add to your name to increase the searchability. Think about a target keyword that your potential users use to research for inspirational accounts, cool hashtags or specific locations to follow. Say you want to attract a target audience based in Berlin — then you’d want to have the word “Berlin” next to your name, because then people can find you through by typing the name of the city in the “People” search bar:

Whatever you think your target audience looks for on Instagram — put that next to your name. If you know your followers look for Instagram coaches, put “Instagram Business Coach” next to your name. If your followers look for interior inspiration, put “Interior Inspiration” next to your name.
Hope I made my point.
Whatever you choose your keyword to be, adding one to the Instagram bio is simple, and you can even do it from desktop. All you need to do is this: Go to your Instagram Profile → Click “Edit Profile” next to the “gear” icon  → Find your “Name” category → Put the keyword in.

If you choose, you can also separate your real name and your target keyword with an emoji — but more on that later.
To summarize:
- Make sure you use your REAL name on Instagram
- Add a target keyword in addition to your name
Keywords are not just useful for searchability, but also for scannability of your profile — which leads us to the next point:
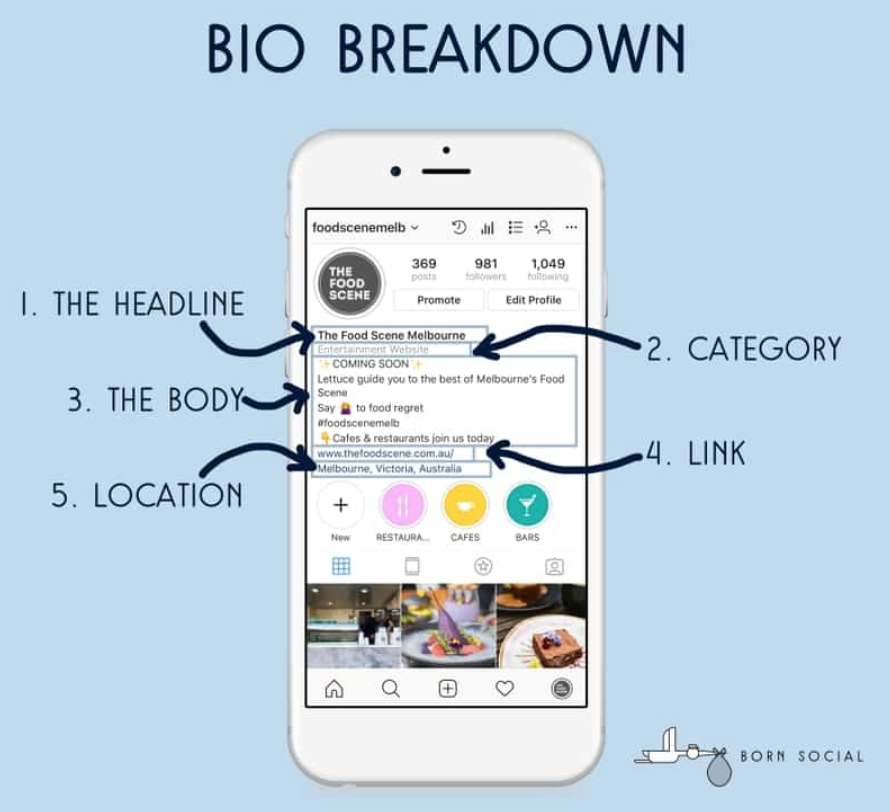
3. Make your bio easily scannable
As I said in the beginning, you only have ⅛ of an eyeblink to make a first impression — that means you basically need to turn your Instagram bio into a QR code, so that when people quickly scan your profile at one glance (as they do), they instantly get what you’re all about.
How do you do that?
Again: target keywords are your best friend!
By adding target keywords to your profile, you’re setting a clear expectation for people as to what kind of content they can find on your account. Take a look at @adashoffash to see what I mean. Just by a quick glance, you’re able to see that her three main Instagram “focus points” are fashion, travel, and lifestyle. Including these serves as an introduction to her account, and might also determine if people will click that “follow” button:

BONUS TIP: you should also take advantage of Instagram’s recent feature that enables you to add hashtags and profile links in your bio. It’s a perfect place to promote your branded hashtag, which is also possible to follow as well. Nowadays, your community includes not only the number of your followers on your own account, but also the number of tags and follows on your branded hashtag. Or follows on your side accounts, if you have more than one!
If you’re looking to add hashtags and profile links to Instagram, it’s easy to do so. Go to your Instagram → then click “Edit Profile” and find the “Bio” section. There, you can add whatever #hashtag and whatever @username you want people to associate you with. For hashtags, don’t forget to use the “#” (obviously) and for usernames — the “@” sign:

Once you save and exit, those hashtags and usernames you just added will be fully clickable on your profile and people can go and check them out.
Using keywords from your niche that your target audience understands will make it clear what you stand for, what you have to offer, and whether or not your account is relevant to them! Ultimately, it is one of the determinants in the “follow” consideration process. So don’t ignore!
In its essence, keywords basically should represent your strongest skills, or your interests that you’re highlighting on your account. So if you have a particular skill that you want to stand out for — include it in your bio! If you don’t know what that skill is — take a look at accounts similar to yours and see what sets you apart from them. Do you have something unique to offer? Do you have a different interest to add to your skill set? Think of your bio as if it’s a CV, where you put forward your best skills, in the strongest combination.
To summarize, the most important thing to remember is that your Instagram account must be:
- Easily found through search (hint: add keywords)
- Easily scannable (hint: add keywords!)
Up next…
4. Add a URL
Instagram wants its users to stay on the platform — so it’s pretty strict as to where it allows you to put URLs that drive the audience to external domains. Driving traffic and measuring your website clicks is, however, one of the most important Instagram metrics for Business. Currently, if you have over 10K followers, you can put a link in Stories and drive traffic from there — but if you’re a smaller account, that obviously wouldn’t work. The only place, really, is your Instagram bio. So if you don’t have a URL there, you’re missing out on your only opportunity to organically drive traffic to your domain or your special offer.
For an example, take a look at this account from @tylerjmccall, an Instagram marketing strategist. Not only does he put a URL to his latest offer (an Instagram master class), but he also supports it with an “emojified” CTA, which makes the offer even stronger:

BONUS TIP: Putting a link to a website or a blog (say, a particular article) is a great start. However, if you’re promoting various offers every week and want to send followers to specific product pages, the lack of hot links can become a challenge, as you’ll be needing to change the links in your bio all the time. If you need to get around this, check out LinkTree, arguably the best tool out there to add multiple links to your Instagram bio for business.
To summarize:
- Place a URL to your latest offer OR your main website OR use LinkeTree to showcase multiple links
- Don’t forget to use a call-to-action to your URL, by adding a line in your “Bio” category when you edit your profile
5. Be in right Business category & allow people to get in touch
Another thing your bio should have is the business description of your account — this is where having an Instagram Business Profile is a must. If you’re looking to build a brand on Instagram, it’s essential to appear professional and, well, brand-like. While having an Instagram for Business account is essential if you want to get access to insights, analytics, and be able to make data-driven decisions, it also offers two perks for your Instagram bio for business: choosing a Business category that represents your brand and adding contact information.
You might not even remember this anymore, but you already picked a Business category once, when you created your Facebook Business Page — which is what you need to have in order to use Instagram for Business. As Instagram is connected to Facebook, the very same Business category you used on your Facebook Page will automatically appear on your Instagram. Here’s an example from ZARA, where it says “Clothing (Brand)” on their Facebook:

And, as you can see, it says exactly the same on their Instagram:

You can, however, modify your Instagram business category if you want to add a little bit more specificity to your bio. Go to your Instagram profile (mobile) → click “Edit Profile” → scroll down a tiny bit → and find the “Business information” category. You’ll see the Facebook Page your Instagram is linked to, and also the “Category” which was automatically pulled from your Facebook Page:

If you click into “Category”, you’ll see a variety of other categories that you can choose from. Currently, there are: Books and Magazines, Events, TV, Film, Local business, Brands and Products, Music, Public person, Other, Sports, Business and Organization, Websites and Blogs. Once you decide which one fits your business best, you can select a subcategory from a drop-down menu:

Remember: it’s what you choose in those subcategories that is going to eventually appear in your Instagram bio.

Once you’ve covered that, next thing to do is give Instagram users an opportunity to get in touch with you. How to add contact options? Easy peasy. Go back to your “Business information” section → click “Contact options”. There, you will be able to add the three basic contact options — Email, Phone, and Address — that will appear on your Instagram bio if you choose to fill them in:

As of late, Instagram also gives you an additional option to add an action button, which connects your profile with other online services — such as Yelp or Eventbrite, for instance — so that your customers can interact with your business and, say, buy tickets or make a reservation without leaving your Instagram profile. All you need to do is click on “Add an action button” → choose the online service you’re using to do your business (e.g. Yelp) → click “Next” → put a specific URL that your business uses → click “Done”. Et voila, the new Action button now appears in your Bio:

You don’t need to make all the contact options available — in fact, if you do, they won’t fit in and you’ll be left with ugly dots on your profile that cut off important information and force the user to click to see more, unnecessarily extending the user journey:

So choose wisely!
To summarize:
- Select a Business sub-category that represents your brand
- Add contact and action buttons (but not too many!) for people to get in touch and do business with you
6. Add personality and be creative
After you’ve covered the fundamentals — keywords, URLs, cross-promoted hashtags, etc — the final touch is to add some personality to your bio. Be creative — you have all the tools for that! Have a favorite quote you live by? Or came up with a funny line that represents your brand well? Use that — like @gypsea_lust and her wander-ful travel account:

Emojis are your best friend here, too. You can use them to space out the text when you write your bio paragraph, like in the example above, which spreads out your whole paragraph into separate lines and makes it more scannable.
To add line breaks, go to “Edit Profile” in your Instagram settings and click “Bio”. From there, you’ll be able to break your bio down if you click the “Return” button. Just remember that line breaks don’t appear on desktop, where your bio will look like Kanye West’s stream of consciousness — but that’s why emojis come in so handy to split the text into parts.
Emojis are also useful when you want to emphasize different keywords in your bio, that help you get your message across visually. Take a look at @emilyskyefit, a fitness influencer from Australia who runs 3 accounts on the side: one for her newborn baby, one for her workouts, and one for her makeup tutorials. The placement of emojis is a smart way to strengthen the focus key points of her account:

I already explained where to add emojis in your Instagram bio, but in case you already forgot: go to Profile → Edit profile → “Bio” section. Just don’t go too wild there!
BONUS: Another way to get creative about your bio is to use a different font. Textizer is a great (freemium) app for that.
As important as your Instagram content and captions are, they are not the first impression you make on the platform — your bio is! With the limited time you have to make that impression count, use the tips above to tweak your Instagram bio for business and improve the return on your efforts.
Thank you to our friends at Iconosquare for these simple, yet impactful tips!
Join ShearShare
Download our app to join ShearShare as a Host or Pro. Check our blog for resources, updates, and news relevant to the beauty and barbering industry. And be sure to follow ShearShare on all social media platforms to join our #ShearShareCommunity!
